
Audacity- Audio Loudness Normalization vs. Normalize: A Practical Comparison
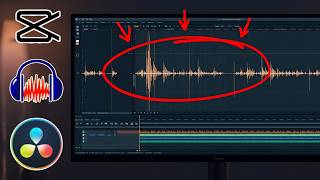
I explain and compares two Audacity effects: Loudness Normalization and Normalize, demonstrating their differences and practical applications for editing audio tracks. They provide a step-by-step guide to applying these effects, showing how they alter audio waveforms and sound quality. Loudness Normalization adjusts the perceived loudness of the entire track, often using a target LUFS value (set to -16 in this demonstration). This ensures consistent volume across tracks. Normalize adjusts the peak amplitude of the track to a target level (set to -1 dB here), focusing on the loudest points without averaging the overall loudness. The video highlights the noticeable changes in waveforms after applying the effects. Loudness Normalization boosts the audio significantly, while Normalize applies a subtler adjustment. To further refine the audio, the creator adds Compression to both tracks, showing how it balances dynamic range. They also emphasize the importance of clean audio and suggest using EQ and noise reduction to remove unwanted sounds.
🎬 More from CREATE with JAY

CapCut Editing Tutorial for Beginners: Audio, Video & Text
9 views
How to Split Left & Right Stereo Audio Channels in Capcut, Audacity & Davinci Resolve
39 views

Here's WHY it Take SO Long to RECORD & EDIT Microphone Comparison Videos!!! (What No One Tells You)
29 views

Shure MV7 Plus vs RØDE vs DJI Mics — Which One Actually Sounds Best?
67 views

Connect the RodeCaster Video to a Rodecaster Pro 2 for Auto - Switching and Zoom Video Calls
249 views

CapCut Pricing Update April 2026: PC vs Mobile — Which Is Cheaper?
476 views