Is this your channel?
zip ties
zip ties
Zip ties are how I keep the harness from bouncing around on the bash bar and along the factory wiring. If you route it clean and tie it down, you won’t have issues later with wires rubbing or getting snagged.
Pros
- +Keeps wiring secure so it doesn’t move while driving
- +Easy way to follow factory harness routing
Cons
- -Over-tightening can pinch wires if you’re not careful
What Logan Birchfield says
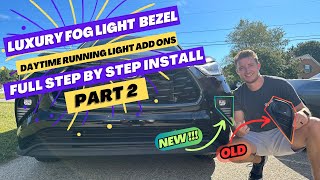
“what's up guys we're back again today with another great video and in today's video This is actually going to be part two of the Highlander DRL install um if you guys miss part one I'll actually pop it up in the corner now so you guys can check it out first um in that video we actually took the front bumper off of the Highlander we took our Factory bezels out that are around the fog lights put in these new ones with the drls in them and then in this part two video I'm actually going to be explaining how to hook up those drls to where you'll have them as you're driving down the road they'll be a nice pretty white DRL and then when you use your turn signals they'll actually do sequential turns so in this video I'm going to go step by step of where I ran my wires and everything so that way they'd be nice and secure and wouldn't get messed up and it's a really good clean way to where you really can't even tell they're in the car so let's go ahead and jump into the [Music] video [Music] all right so as you guys can see I've got both lights installed with the wires coming through right here on both sides and now I've moved the bumper in front of the car that way I can kind of see where the wires need to go um so they brought they give you a wire and harness and it's got a little box and then it's got a longer lead on one side which is going to run to your passenger side and then a shorter lead for the driver side so here is I've kind of already set it up so you guys can see how I'm going to run the wires so as you guys can see right here is the first uh pigtail or the first wiring that's going to hook up to the fog lights right here and this is going to be our harness it's going to run right across and there's actually going to be a little bit more wire right here it's just obviously it's kind of folded once we zip tight and clean it up we'll have a little bit more um but also you've got a pretty long lead right here so they give you a generous amount of wire which is really nice so we're going to run it straight across as you guys can see so it'll run right through here and then I'm going to run it with the factory wire right here that'll be something good that we can zip tie the wire to and then as you guys can see the box right here is actually going to be hidden right behind this air diversion panel and it'll kind of keep some of the rain water stuff like that off of the Box um just kind of help it a little bit and then what we're going to do is here's the second pigtail and I'm going to run it right across and I'll actually zip tie up right here and then you can see it's going to be right here with our fog light harness which will be nice and I'm going to leave a good amount off so that way if we ever need to take the bumper off you know it'll give us enough room to pull the bumper forward and still be able to disconnect this so then what we're going to do is as you guys can see our other wires are running right through here and they're going to come up as you guys can see down in in here right right here so they're going to come through right there there's actually some Factory wires right there that you can zip tie the wire to to kind of make it cleaner and then we're going to run it right up and then once I get this all hooked up like how it's supposed to be I'll show you where these wires are going to hook up to and kind of a better way of how to clean this area up but this is kind of how I'm going to put it for now and then what we're going to do with our yellow wires is we're going to run them up through to where we can get to the turn signal because your factory turn signals up here is actually what's going to tell the new drls that were adding underneath the fog lights um they also do the turn signals if you want to wire them that way if you don't they can just be daylight running lights and stay white I'm going to go ahead and wire them to the turn signal so that way you guys know how to do them if you don't then you just won't hook them up and then they'll just be daylight running lights pretty much um but we're actually going to run the yellow wire up through here because we're actually going to tap into to the turn signal wire on either side and then that's what's going to make the function work for the the turn signal or the DRL to change to a turn signal and then go back to a DRL so we'll also run that yellow wire up through with this one on this side and then we'll just run it straight up over there on that side as well all right so I got everything zip tied up I actually took two zip ties and wrapped them around the bash bar right here in the front and then I took a smaller zip tie and then just zip tied the wire to it that way it would hold it and it's not bouncing around everywhere when you're driving down the road same thing right here two went around and then I zip tied the wire to the one zip tie and then once you get over here you can actually just zip tie it straight to your factory wire and harness and it's super hidden super Sleek looks good and OEM and then we get underneath here and I actually put some 3M double-sided tape on the back of this box the conjunction box right here and I actually stuck it down on here so it's not bouncing around or moving around if you guys don't have that you could probably um zip tie it up to here or wherever you kind of want to move it but I would suggest putting it somewhere that it's kind of going to be a little bit protected cuz it's just good for the conjunction boxes not to get super soaked or somewhere where they can get hit by something um so as you guys can see then we ran our other pigtail all come out to it it's actually right here right beside our fog light harness and I see zip tied it up the factory harness and then we ran it straight across right here right over to the conjunction box and then here's where we're going to get our power and everything at and it's going to run through right here and come up and then as you guys can see it's coming through right here and I hadn't zip tied anything else from here on cuz like I said I'm not exactly sure where I'm going to wire this or how I'm going to wire it yet um so I've got it all to there now when we put the bumper up I'm just going to run the yellow wire up through the same way I did everything else on this side and then on the passenger side as you guys can see you can actually see down there really really good on this side so I'm just going to run it up up right into here with the factory harnesses and then I can just grab it from here and we can do the wiring that we need to do all right so I got the bumper set up here and it's kind of cool because you can there's two little plastic Clips right here and right here and it'll actually hold the bumper up for you there's no bolts in it at all I don't have anything popped in right here um what I'm actually going to do is go ahead and put one bolt in here and one bolt in over here so it don't fall on me and then that'll kind of allow me to pull pull this back and I can stick my arm in here and Route this yellow wire up where I want it to be at on both sides and then we'll actually go ahead and put all of our bolts in also too before you put the rest of the bumper back on make sure your sensor's hooked up on this side your fog light hooked up on this side and then also that new DRL plug is hooked in on your passenger side on your driver side you just need to make sure your fog light one's hooked up and then the new DRL plug is hooked up also I was going to let you guys know this is kind of a little thing that I do I put each bolt set in a different baggie so here's all my bolts that are going to go underneath the front bumper here's the driver side Splash Shield passenger side Splash shield and then I already opened the bag of the four bolts that underneath the radiator cover right here um I put those in like I said so the bumper wouldn't fall while I was reaching through running those wires up um so here is where my turn signal wire is going to be on this side and then this is how I have my wires on this side that way um we can use the vehicle T [Music] not me [Music] all right so it's the next morning and now we're going to go ahead and wire everything up like I said we got the bumper all back on and everything put where it's supposed to now let me show you guys what we're going to do with the wire so on your passenger side you've got the one yellow wire that's coming up you're going to reach in right here where you're turn signal is and you're just going to disconnect that plug and I'm going to show you guys right here the dark green wire which is to your left if the plug clip is up that's where you'll stick the yellow wire so as you can see we've got it stuck in there for test purposes so I can show you guys and then you're going to do the same thing on the driver side with that yellow wire you're going to hook it up to the um it's a darker darker green on this side as as well but it's just on the far left if the clip is up and then we're going to head right up here and as you guys can see we've got our red and white wire right here and our ground wire I've got our ground wire set up right here just for test purposes and as you guys can see I pulled the connector out right here which is your marker lot on the side of the car um which is a light that turns off once the car is off but then is basically always on when you're driving the car so it'll allow these to be on the whole time so on this one the red is going to go to the gray wire and the white is going to go to the yellow and black wire so if the clip is up like it is right here you've got the red on your right and the white on your left and that's how you'll stick those in now I'll show you guys up front I'll get in the car and I'll kind of test them so you guys can see how they all work and then I'm going to show you how I'm going to connect the wires to those harnesses all right so I'm just going to flip it to the parking lights right here that way you guys can see how they look and as you guys can see they're on over here and they're on over here so what I'm actually going to do is I'm actually going to go back right here and I'm actually going to cut the wire in half and I'm going to solder these wires in line and use some heat shrink to make it all look nice and look Factory um they also make heat shrink itself that has solder in it I'll actually pop up a picture now of what that looks like um if you guys don't have her solding iron or not able to solder um you can buy these instead and it's pretty much same thing you'll just put your wires in there and then heat it up and the solder that's within the heat shrink will actually melt and it'll be soldered together as well um I did have some of those but I've ran out of them so I'm just going to go ahead and solder them in so this will kind of be the more advanced option the other opt option will be a lot easier for anybody to do all right so I'm going to show you guys how I'm going to solder this on the passenger side cuz it's going to be a lot easier for me to show you guys over here so as you can tell I've ran my wire up and I've actually got it zip tied right here to the factory harness ran around right here and then what I've done is they just have this electrical tape ran around this wire loom just take that off and then you can pull your factory wiring hard out of the wire loom so don't be afraid or anything this might look kind of scary wiring is not scary at all you're good as long as you've got the right wire that you need which I've told you and then I'm going to show you guys how to clean it up and make it look Factory to where it don't look like a jumbled up mess underneath your hood so we've got it zip tied to here and then I pulled the wire loom back so now what I'm going to do is is I'm actually going to cut this green wire in half right here and I'm going to strip the wire back on this side strip the wire back on this side and then we're going to cut our yellow wire to the length we need and strip it back so then what we're going to do is we're actually going to mate the wire coming up right here and the yellow wire together and then solder it back to this connector side and then once we do that we can tuck it all in this wire loom right here and then we can rewrap the tape and you won't even know it's in there at all except for you'll just be able to see the wire right here really you can pull this wire loom all the way back but there's actually a factory zip tie that goes around it right here so that's why I've decided to pretty much just go right past that factory zip tie so I'm going to go ahead and cut my two wires and stuff I'll kind of speed it up in a time lapse and show you guys how I'm going to do it and then you're going to do the same thing on that side also before you get started make sure you disconnect the ground wire on your battery terminal that way anytime you're doing electrical stuff you always want to do that in case you accidentally hit a wire to another piece of metal and it shorts it out it won't hurt your you know like your body control module or any of your module inside the car um so I have already done that and you want to give yourself a good amount of length right here so as you can see our harness is way down here and I'm just going to come in and cut right here in the middle just like that so now I'm going to go ahead and strip back this side of the wire and this side of the wire and then also cut our yellow wire to length right here and strip it back and I'll twist them up on either side and then I'll show you guys me soldering it together so as you guys can see right here I've got the wire strip back on both of those and we've got those wires Twisted together and then we've already put our heat shrink on right here um do not forget to do that before you solder cuz if you do you'll have to break your solder back off and it's a pain so we've got that on there and then now we've got our wire on the plug side right here strip back and then I'm just going to cross these together just like so and there's a lot of different ways that you can do this part right here this is just kind of the method I've always done so I've got them Twisted together now I'm going to come in with my heat with my solder and I'm going to solder this connector good and then I'm going to kind of clean up some of the wires slide our heat shrink over shrink it on and then we'll lay it back in this wire loom and we'll be good to go so now I've got it soldered together as you can see right here now we'll slide over our heat shrink that way no water or anything will get in there this is also waterproof heat shrink it's got that extra protective gel inside of it um also if you guys are going to get that type of heat shrink I would suggest getting some waterproof uh heat shrink or like Marine heat shrink I just like to be extra safe when I'm doing anything on the cars and then now we'll take our heat gun right here shrink it down just like that and then there's your finished product and then as you guys can see once we lay it back in the wire loom it'll look just like Factory again um so now what I'm going to do is I'm going to do this off camera and rewrap it and show you guys the finished product and then I'm going to go ahead and do all the other wires off camera and then I'll kind of show you what they look like after and explain it all right so there's what it looks like all cleaned up so there's what your OEM plus install will look like right there really clean um nobody probably would even notice that you added anything to this right here so now we're going to go ahead and plug this side back up and I'll get started over there all right so we've got our other turn signal wire hooked up right here and as you guys can see I ran it up right beside the fuse box right here and went right across and then we ran it right into the wire loom like we did last time so now it's hidden from that point up and looks like Factory and then then up here I actually took the white red and ground wire out of the sleeve a little bit as you guys can see here's the sleeve it was in um and I pulled it back that way we can put the white and red wire in this gray wire loom right here and make it look Factory and hidden and then also it gives you more room to kind of put your ground wire somewhere else because before with the sleeve up here it was harder to get your ground wire where you needed and this there's no point in this ground wire going in the wire loom either because it's going to be routed um probably underneath this bolt right here so it kind of lets it take its own path a little bit better so I'm going to go ahead and cut these back and do what I did right here remember your red wire is going to the gray and your white wire is going to the yellow and black wire on this plug so there's what your white and red wire is going to look like once you get them all done I actually had a problem getting the gray tape off so as you guys can see I replaced it with some black electrical tape not a big deal it's just there to hold the wire loom together so the wires don't come back out so now let's move on and I'm going to show you guys what I'm going to do with the ground wire so here is our ground wire and as you guys can see I didn't add any wire or anything it's the perfect length to where you need it so the company didn't great on that um the only thing I did was I just switched to a bigger ring that way it would fit around the bolt I'm going to use so that's the only thing that I did was switch this part um and then obviously you remember we pulled back the uh sleeve on it that way it can kind of come up by here by itself and the red and white wire is tucked up underneath with the factory harness right here so I took that bolt out now we'll put this on there and we'll have a good ground and then we'll test the lights and make sure they're working all right so I've got it all set up and we're getting ready to do our test we'll do one last look over so as you guys can see on the passenger side we've got it running up and then we go into our Factory harness here really clean on this side side now we're going to go to this side and as you guys can see we ran up the yellow wire right here it goes into our Factory harness right there and also we ran up our red and white wire and it's actually tucked up underneath here um that's where it's hooked into the factory harness and you you can't even see it anymore cuz this is the harness that it's actually connected in and then we've got our ground snaked up right here and hooked up right there so as you guys can see on the driver side too very clean not even really noticeable that there's anything in the engine bay whatsoever so when you've got your parking lots on you're going to see the Amber of your turn signal on you're going to see your new drls on and then obviously the little side marker is on then this is an XLE so if you've got a limited or something higher um you guys have like that run and lot underneath um that would probably also be on at this time so there is what it looks like just driving down the road with the parking lots on on I'm not sure how Auto Works exactly um so now I'm going to have her do the turn signals so you guys can see what they look like and then when you flip them off they go back white and then there's what your hazards would look like right there and then I'm going to have her turn the headlights on and that's what it'll look like with the headlights on so you've got your fog lights over here and over here with the drls and they look really pretty and nice and then obviously you got your headlights on with your parking lots or your Amber lights up front and now we'll have her do the signal Lots so that way you guys can see what it looks like with it on all right guys so that's pretty much it for today's install I hope you enjoyed the video I tried to break it down step by step as good as I could that way it would make the install super easy for you guys guys um again don't forget about getting a longer screw for the bottom of the bezel um hopefully I did let them know about it so hopefully they'll start adding one in the kit so it's easier for you guys you don't have to run out you know to like Ace Hardware Home Depot Lowe's and get that longer screw hopefully it will be supplied um coming soon but like I said I will add any of the supplies that I use solder solder iron all that stuff I'll put it in my link tree down below um you can just hit the Highlander Dr LS and once you click that tab it'll have everything I used and it'll have those bezels on there and I'll also just put the car trim home a website for the bezel so you guys can just do that or if you check out my link tree it'll have all the supplies that I used um so that way it makes it a little easier on you guys when you do the install you don't have to run out and grab you know that one item or that last minute thing when you're in the middle of doing an install um so anyway guys like I said this is a really good product the fitment is perfect the lights are actually pretty bright for what they are um I mean again it's just supposed to be like a DRL it you're not really supposed to use them as like fog lights or something like that um but they do make the front of the car look a lot nicer and a lot brighter going down the road which is really cool so I would definitely give this a thumbs up and I would suggest it to you guys um this will be a little bit harder on our you know like your scale of an install um for the Highlander and some of the other stuff we've done for the Highlander but you guys can easily do it as long as you just watch this video I pretty much tell you guys step by step um so anyway guys if you have any other questions about the install just leave a comment down below and I'll answer them when I can and also please like and share this video so we can reach out to more people so anyway guys peace out and remember build your Masterpiece hey I got something something to say I'm just so sick of hearing everyone complain I know it's tough and I know there's pain but hidden bottom is the only way to change sh”
Curated by
Logan Birchfield