Is this your channel?
Heart
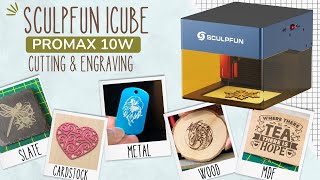
I cut this heart from card stock to test how the iCube handles paper crafting, and it was super fast—about two minutes. If you’re into cards, journals, or scrapbooking, little cut files like this are exactly where a compact machine like the iCube shines.
Buy on Bit
You'll be taken to Bit to complete your purchase.
Pros
- +Cuts card stock cleanly and quickly
- +Perfect for small embellishments and paper crafting
Cons
- -Small designs may need resizing depending on your project
What Go Laser Go says
“hi I'm wand from go laser go now today we're going to take a look at the scop fun IQ Pro Max 10 WT laser and this is one of the many portable machines that seem to be hitting the market lately and we'd like to thank sculp fund for giving us the opportunity to review the I Cube and these type of machines are generally less complicated than most laser machines and they can be easily moved around and stored making them ideal for someone who wants a machine that's easy to use and takes up little space they're also more stylish looking than regular frame style diode machines and yes okay that may be a bit of an exaggeration but if you compare the I cube with the sculp fun s30 that we reviewed a couple of years ago it's easy to tell which one is more appealing to look at however these smaller machines do have their limitations so we' never want to give up our frame style lasers but it's easy to see why the IQ will appeal to say the beginner or the home hobbyist or even a season professional who just wants something that can be transported to craft shows so let's get on and see what we got and what it can do now in the Box we found the machine of course and it comes with an orange u-shaped safety cover now this Shield has a protective coating on the front and the back so you'll need to remove that before you use the machine also on the box there are a number of other accessories including the laser module and all the necessary cables a replacement filter set some safety glasses always essential a manual a piece of MDF board and a piece of Basswood and a repair kit which includes a chrome wrench some tweezers a spare Lens two Len Keys a second wrench and a cleaning cloth there is also a removable metal plate that sits in the bottom of the machine and as it is an attached with screws is easy to remove on the front of the machine you have the safety cover which can easily be removed as it simply slides out on the side we have an audio outlet and this is for buzzer alert sounds an on andof switch a power slot and a type- c port and on the back of the machine we have the exhaust fan Outlet it looks like there is an air purifier that works with this machine based on the images on the sales page but I've been unable to find it for sale on the website as yet this may be an accessory that will be available in the future now on the inside of the machine you can see that it comes with a plate which I've already mentioned this protects the surface and provides a base to place your material you can also use it without the plate and as you can see we have a tile that we purchase from our local hardware store that we use to protect our work surface I would have liked to have seen some sort of Ridge insert to hold the plate in place as it does move around the I Cube has a working area of 130 mm by 130 mm now this does limit the area that you can engrave or cut however you can overhang materials on the base which is great so you can work with larger objects or you can just lift up the machine and move it onto the area that you want to engrave now the machine that we have is a 10 wat but it does come in a 5 wat and 3wt version although I don't see the option to purchase the 3 Watt on their website at the moment of making this video personally I would stick to at least a 5 watt anyway and if funds allow definitely go with the 10 wat especially if you want a faster machine and your focus is on having the power to enable a nice clean cut you can check out the comparison between the three machines on their sales page to see what's right for you and we'll put links in the description field below now another thing we need to mention is that the I Cube has an inbuilt smoke filtering system so we were able to use this in the craft room however we still had some burning smell so it's not going to eradicate everything plus to be fair we did have the shield off for a lot of the time for filming they do include a replacement filter kit in the box which is nice and on this sales page they do show an air purifier which is not currently available and maybe a later accessory that you can purch es a setup is very easy for this machine you only have to attach the laser module and that's pretty simple it's just a matter of sliding the module onto the machine and tightening the screw that is attached to the laser Mount there's also a cable that needs to be plugged into to the back of the laser head now once the module is attached the only thing left to do is to connect the USB cable from the machine to your computer and of course plug in the power cable now sculp fun do have their own app so you can use your Mobile phone or tablet to use this machine the software is easy to connect and you can get a lot done with it but our preference is to use lightburn and that was simple to set up lightburn found the machine automatically so there was no need to do a manual setup now that we're connected we are ready to start testing and the first thing we look for when we start out with any new laser machine is a material settings list but unfortunately scul fund do not have one specifically for this machine on their website we found the super long page of information which is actually quite good but no specific settings for the I Cube and yes I agree that there are no Universal settings but as someone who has been using a numerous different lasers for a while now I still have to see a materials list it gives me a ballpark seting to go with and something to base my testing around when asked they advised us to use the material settings list for other similar machines personally I would like to see a separate list for each machine and especially so for the I Cube which is a sort of machine that suits a beginner or a home hobbyist to is just starting out with laser engraving if they have to guess they could potentially risk a fire causing damage to the material they're working on or with the machine itself so let's start with an MDF coaster now MDF looks amazing when engraved and it's pretty hard to mess it up so it's always the one we begin with now you can see we are working without the plate so in order to focus we just need to move the laser module into the center then we just pull down the focusing lever and turn the screw on the side so that we can lift the module up and down the goal is to get the lever to be leveled with your material now once it's level you can tighten the screw and then lift the lever back up in lightburn we just need to adjust our settings to suit the material we are working with now for MDF we went with 3,000 speed and 15% power and then we HED the laser module by clicking on the home button and we click on frames so that we can position our coaster in the right position to do this you can move your image around and light Bur or you can move the coaster like we did here now once we're happy with the placement we can click the start button it is a good idea to use the safety Shield so you can put this on before you click the start button otherwise you definitely want to use your safety glasses and sculp fun includes appear in the box with the machine now the file we use for this coaster came from creative Fabrica and there will be a link to that in the description field below you can see this is coming out great and the final result was perfect so we were very pleased with our first test and we wanted to try a few Wood Products so we started with a coaster we went with a speed of 3,3% for the power now if you want to see the settings for all of the materials we tested in this video there will be a link in the description field below to our website now as you can see this is coming out great but in hindsight I wish we had made the image a little larger to cover more of the coaster but otherwise I'm pretty happy with the result continuing on with the wood theme we tested some small tags the five we downloaded from creative Fabrica and the I Cube did a great job with these I mean if you're going to do these on mass you would set yourself up with a jig of some sort which would make this process a whole lot easier the next thing we wanted to test was The Cutting ability of this machine so we chose a wooden bookmark file the engraving went beautifully but as it started cutting I thought it looked a bit too intense and that we would end up with Charing but it actually ended up coming out perfectly now this was a 2mm piece of ply but sculp fun claims that it can cut up to 10 mm so we thought we would test it out on a 5 mm piece of palonia wood now this was our first attempt at cutting at 180 speed and 100% power with one pass it cut through beautifully but we thought we might try again with the speed increased to 250 to try and reduce some of the charring next we tried a slate coaster and engraved a dragonfly onto it this came out okay but not as good as I would have liked it looked a bit rough we used 500 speed and 100% power and that was way too intense we did a bit of testing with multiple settings and ended up with a speed of 3, And1 100% power now this was a big difference to our original settings and I think it came out a lot better plus it took about a third of the time we also like to test on anodized aluminium and this time we engraved a dog on one side and an eagle on the other and you can see how nicely these turned out now if you make cards create journals or do a little bit of scrapbooking then you will love this machine it's small and compact so you can easily cut lots of little embellishments to suit your project as you can see here the machine Cuts card stock beautifully and super fast the heart took only 2 minutes to cut you can see we also cut some tags and they cut perfectly but in hindsight of course we should have made them a lot larger but they'll slip nicely into some tuck spots so let's take a look at some of the pros and some of the cons of the I Cube so for the pros the machine is small and compact so you can easily move it around and store it it has an inbuilt filtering system which means you can use it indoors in your craft room it's super easy to set up and connects easily to lightburn and even though it has a small engraving area you can engrave on larger objects the cons now the machine is quite noisy I think this is because of the inbuilt air filter I would have liked the option to tune this off the base plate moves around so it would have been nice to have a Groove that it slipped into to hold it in place or a couple of screws at the start we found the safety Shield a little fiddly to slip into place although we did get the hang of it after a while but overall we really like this machine and enjoyed using it it's great for small projects and it's definitely one we'll be bringing out regularly to use so once again thank you to sculpt fun for sending us this great little machine to review and if youve enjoyed this video please give us a thumbs up and subscribe to the channel and thank you so much for watching”