Is this your channel?
Amazon
I linked Amazon as another place you can grab the Wainlux K10 if that’s easier for you. For a machine like this, buying from a marketplace can be convenient for shipping and availability. Just make sure you’re getting the correct K10 model and accessories you want.
Buy on Amazon
You'll be taken to Amazon to complete your purchase.
Pros
- +Convenient alternative place to buy the K10
- +Often easier shipping and checkout
Cons
- -Listings can vary by seller and bundle
- -Availability and pricing may change
What Go Laser Go says
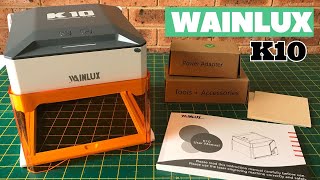
“now today I'm going to be talking about the way luux K10 now this is Wayne lux's latest laser engraving machine and the first thing you can probably tell is that this thing is Tiny it's so small that I can hold it in one hand it seems to be a bit of a trend right now for these small and more portable machines and I personally like them a lot they do have their drawbacks however and we'll get into that a little further on but if you're wanting a laser engraver that's easy to move around easy to store and one that won't break the bank then this may be the machine for you so let's take a look at it in more detail and we'll start with a quick look at what you get in the box so we have the machine and a user manual there's some power cables and a type c cable there's a mark a pen a brush and a wrench now you also receive a couple of pieces of craft paper and two pieces of wood now let's take a closer look at the machine itself on the top we have an onoff button an offline button which as the name suggests allows you to engrave offline and I'll talk more on that later there's also a status indicator which provides visual cues depending on the status of the machine so for example when you turn the machine on the light changes to Blue which indicates that the machine is in standby mode and when you open the shield the light will Flash and the rest of the indicators are listed in the manual on the back we have a typ C slot a power supply slot a slot for the rotary tool which is an optional accessory a TF card slot which has a TF inserted in it which has the driver and the cut lab x software loaded onto it and you can also use it for working offline which I will go into a little further on in this video and just below all of that is a port for the air purifier which is also an optional accessory now let's take a look at the inside of the machine you can see that the base is open and there's an optional base plate that is called an engraving positioning module and you can see what that looks like in the manual now I'm not sure whether it can be used to protect the surface but since we didn't get one we went and purchased the tile from our local hardware store it only cost us a buck and it does a great job of projecting our work surface now the laser module itself is tucked inside and it is quite small now you can also purchase the upgraded module and you can see the difference between the two here we have the K10 laser version ver now the first thing to note is that this machine is only a 3 watt so it's really only suitable for Engraving but for many this will be enough especially if you purchase blanks that are already pre-cut you are also limited by the amount of Engraving space which is only 80 mm x 80 mm although the area in which you can place materials is larger at around 145 mil by 160 mil now bear in mind that you cannot overhang materials because if the safety cover is even slightly open then the machine will not start however if you have a material that is larger than the working area you can simply lift the machine up and place it on top so it's not a big working area but for those that work with small items then that size won't be an issue and you can purchase a ton of different types of Blanks on Amazon and I'll put a link to these in the description field below set up for this machine is pretty simple it's just a matter of connecting the power cable and plugging it in and then connecting the USB to your computer so unlike a lot of laser machines you don't have to build this one which means you can use it straight out of the box the way luux does come with its own software which is called cut lab x but we prefer to use lightburn now you can see how we connected it to lightburn here and it did find the machine automatically which was nice to see so we didn't need to go looking for files to download to get it connected so we're going to test out a few materials to see how well this performs and start with an MDF coaster so the first thing we need to do is focus the machine now to do this we place the coaster under the laser and then place a thin piece of card stock on top of it now this card stock is just there to help Focus the laser correctly there are actually a couple of pieces of dark colored card included with the machine for this purpose now turn the focusing wheel until the laser light is as small as possible and once youve focused the laser correctly you can then frame frame the image now in order to frame you have to close the safety Shield personally I would like to an option to leave the safety Shield open while I do this as it makes it easier to see the framing light and it also makes it easier to move things around but we did end up creating a placement template to make things easier and I will go through that a little further on so this is the coaster engraving now and you can see how it's going MDF is always such a great material to start with for a as it always does such a beautiful job and you can see that this is the case even with this little 3w machine now you notice that it comes out quite dark but this will be salt on the top but you can clean that up with a tissue or soft cloth we did end up doing a second engraving on around MDF coaster as you can see here now if you want all of the settings that we've used for these materials just head over to our website at go laser go”