
Is this your channel?
Floor Lamp
Floor Lamp
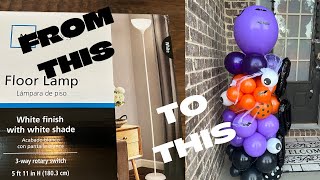
This floor lamp is the whole “hack” in my setup—once you remove the top and pull the cord out, you’re left with a sturdy base and pole that works like a balloon stand. I love it because it’s an easy way to create a balloon display without buying a specialty frame.
Pros
- +Sturdy base for a balloon garland display
- +Pole pieces let you adjust the height
- +Budget-friendly alternative to a balloon stand
Cons
- -Requires disassembly and dealing with wires
- -You need a Phillips screwdriver to remove parts
What Esther's Royal Party Designs says
“hey friends welcome to my channel if you're new or welcome back to my Channel today I'm actually going to show you how to use a lamp stand a floor lamp stand like from Walmart and how you can build a balloon Garland in this case I did this look for Halloween but it will work with any look that you going for any type of look or design and I'm going to show you step by step how to put it together you do need a screwdriver you will be dealing with wies so just be a little bit careful but I'm going to show you how you take it from a lamp standand and how you can use it for rec stand for a balloon [Music] Garland okay here you see me taking pieces out there are certain pieces you won't need you will not need the top of the lamp where the light goes in you pretty much will just need the pose and you're going to need the bottom part of the lamp which is the base part and what you're about to see me do is we have to get the cord out from the base now in order to do this you will have to take a few pieces apart and I'm going to show you exactly how to do that right now you have to unscrew the little clip this is normally the clip that turns the light on and off and then we're going to have to unscrew the part that the bub goes into so that's what I'm doing [Music] now all right once you get that unscrewed you should be able to pull out the part that we have to remove the wires you need a a Phillip screwdriver but there's two wires attached to two screws on either side of the a light bulb part and you simply just take a screwdriver and you unscrew those and then you'll be able to detach the wire from the [Music] screw once you do that you do have to straighten out the wires you need to be able to pull it through the hole right there as you see it's not going through so I have to adjust a little bit more and straighten out the wires a little bit cuz I'm going to need to pull this all the way through now can get it through now we have that together the next part is to just go ahead and Slide the poles off of the lamp stand and then I'm just removing the protective paper that comes on it too [Music] now that I have all the poles pulled through you see this cord we actually have to push it through to get it out of the lamp base so you just keep feeding it through and then you pull the end of it to get it out of the lamp [Music] base and now we have all the pieces that we need mine is the cord to attach our lamps um so you just go ahead and get those screwed in in this case I think I only Ed four of the six pieces because I'm not going to do a full stand this is going to be like a smaller Garland so I only use about four of the [Music] pieces and then the final step is to screw all the lamp holes into the bottom of the base now I'm going to show you if um you watch my other clip you will see how I use balloon Clips to add the balloons onto the stand that I did this I'm just doing a twist of the balloons you're pretty much taking one balloon and you twist it over another and it locks it into place and if you check my other video that I did for the other stand that I did for Halloween you will be able to see in detail I do show you how I make the clusters for the bigger 10in balloons and also the 5in balloons in order to be able to slide them on I do show you how I blow up the balloons and tie those together so make sure you check that video out [Music] now what I'm going to do is I'm going to put a balloon on the top of the lamp pole the reason why you do this cuz it prevents any balloons that go close to it from popping now I'm going to add some 5 in balloons and again make sure you check out my other Halloween video so I'll show you how to make these clusters with 260s and the 5- in balloons just give it more Dimension and build the to look in even more [Music] [Applause] [Music] [Applause] [Music] now I'm going to go ahead and add some bats to the balloon and this all came with the balloon decoration kit I'm going to put that link in my description below just so you can see how the kit was that I did use for Halloween and then pretty much these are little stickers and you just stick them onto there you take the back off and then you can stick them onto the balloons now these are eyeball balloons and I like the eyeball balloons cuz they add like a little fun um thing especially for Halloween so they're 5 in you just blow them up tie them and then you'll see me in a second I'm going to just use some glue dots to attach it to where I want it to go on the balloon Garland I had an extra set of boua letter so I figured that I would go ahead and add them to this balloon Garland and make sure you continue to watch to the end because I do show you the final look in a couple minutes of how the look came together with both the balloon garlands together that I made but I'm just adding some glue dots and then attaching these letters to the Garland I did add a 18in balloon to the top of it pretty much with the 260 and you just wrap it around the other balloons I do not have that on the video but I did add the big um purple 18in balloon to the the top of this Garland to complete the look and these looks that you see now are right before I'm about to bring it outside I do bring it outside to finish [Music] it and here's the final result [Music] thanks for watching make sure you subscribe give me a thumbs up don't forget to check out the other video I did with the other stand and have a royal day”
Featured in this video
Floor Lamp
Available on Amazon
External purchase
Highlights
- +Sturdy base for a balloon garland display
- +Pole pieces let you adjust the height
- +Budget-friendly alternative to a balloon stand
Recommended by
Esther's Royal Party Designs