Is this your channel?
UV Light
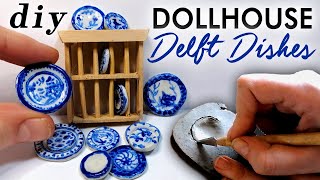
I use a UV light to cure gel nail polish, which is how I get that glossy, glazed finish on my miniature plates. It’s one of the easiest ways to make tiny tableware look like real ceramic at dollhouse scale.
Buy on Shorturl
You'll be taken to Shorturl to complete your purchase.
Pros
- +Cures gel polish quickly
- +Helps create a realistic glossy “glaze” finish
Cons
- -Only useful if you’re using UV-cure products like gel polish
What Tasmin Bassett Art says
“[Music] hello everyone and welcome back to another video it's been a while um but today we are going to be making a plate rack and a miniature set of plates for said plate rack and this is where I'm hoping to place it in my little miniature kitchen so I hope this video will give you some tips and tricks on how to create some realistic plates for for your miniature projects yes we do have a pig in the kitchen uh he's just making breakfast it's not a bacon sandwich so nothing to worry about there um but today in this video I'm going to show you how I make these plates and I hope it's helpful to you so first things first is you're going to have to get yourself some air dry clay for this project um if you want to make it a lot easier on yourself I would recommend purchasing some white air dry clay just so you don't have to paint the plates that color it saves a lot of time so the first thing you're going to do is just um roll it out to about a thickness of about a pound coin you can go thinner but um I think with this these techniques it's slightly better to have a little bit more of a thickness just so you can correct some mistakes so this first technique I was playing with was creating um some cutouts in cardboard the size the plates that I want to create this kind of indentation that gives the effect of a plate and the dip that you get in the plate so I'm just kind of rubbing that there to give the impression and when you lift it off you will get a shape now I didn't cut these out perfectly circular so the the the dip on it is not going to be amazing but you can correct this afterwards with a little bit of molding and um a paint brush brush so to finish this little technique off I'm going to just trim around the edge to create the lip of the plate um and you can do this fairly messy try to be as circular and neat as possible but all of this can be corrected um afterwards so you can smooth the edges with your finger and a little bit of water and um trim off any excess to make it a lot more rounder you can can correct and mold that plate and leave as is um but I'm going to keep on adding with these techniques to show you different ways of going about this so grab yourself some buttons uh find your sewing box and find some buttons that are the same size as the plates that you want to make um as you can see they're kind of like the perfect size to create a good template and if you've got ones with flat sides that's even better these can then be used in inside that uh plate mold that you've just made as a just to make an impression basically um so yeah you can just push them down you can also fill the holes um or just go over with a little bit of tape just to uh help that uh little button holes sticking but as you can see you can just cut them off really easily um and you can create that um dip uh that's the perfect size for your plate um I use a flat one uh with no holes um that is also pretty good and again I'm just trimming around the edges to make it neater similar to the cardboard technique you can also use the button directly as a mold and then just trim round like you would a pie crust um that can create a more easier effect if you don't want to do the cardboard thing or it's not working out as good for you um if you don't have buttons you can use use various things I've got Thimbles and bottle caps and all sorts of things you can use as a mold to get that perfect circular shape is it's quite hard to find really small Perfect Circle things so rage your sewing box you're bound to find some something in there so the next technique I'm going to do is pretty much the simplest and I think most effective is just to cut a circle and trim around make an impression with either a button or a small uh circular thing with a flat Edge on it to create that nice indentation and then just correct and mold to create a lovely little plate um this is the easiest I trial a few here so you can get an idea of the process um that I went through and how certain things work and maybe it'll help you come up with your own ideas too um or improvements possibly to this uh tutorial um again here just using the button as a template and using another one on top to kind of press in as a mold and then you just free it from the base and correct it with a bit of molding with a uh brush and that can kind of also create the divot um on the opposite side as well um so yeah once you've got a few plates no matter what technique you're going for um you're going to want to sand them down because they probably will turn out a little bit rough using some of these techniques so to remedy that just get yourself a brush and water and or some smoothing tools and just smooth away until you've got some decent looking plates there's still going to be another level of uh correction here through sanding so don't worry if they're still a little bit scruffy looking so once they have dried they're going to turn this light gray color if you have the white clay they should stay beautiful and white um but now we are going to sand them down just to get rid of any of that surface roughness so when we paint them it'll be a lot more smoother for the end result so I'm just smoothing the edges to create more roundness and the tops and bottoms just to create really nice smooth finish as you can see they're a lot more flat and even now so for me I had to paint these white which took a little while so really would recommend getting that white clay um as it's a hell of a lot easier um this took about two coats uh with this particular paint but of course you don't have to paint white you can do whatever color plate you would like get creative and have a look at some designs online for your inspiration so after painting it's time to design them for my designs I'm going to be using gel and nail polish which is cured via UV light I've chosen this dark blue and I'm going to use a tiny little brush and top them with top coat which will act like a clear varnish which mimics the glaze effect on Pottery um I also did a trial run with covering bare clay with nail polish white nail polish and doing then the detail and then the top coat over the top it did work and hardened very nicely but it did seem to lose the detail in the plate and yeah it was just a bit too thick so I would recommend either going in with acrylic paint on top of this and finishing with a varnish if you don't have any nail polishes or just go in with this nail polish gel gel polish which will dry under the light and make it super hard and durable so I have been inspired by the Delware Pottery um which is lovely blue and white designs that are inspired ired by um chinoiserie kind of styles and just lovely vintage Pottery so that's where I'm going with these so I'm kind of trying to create intricate designs with floral elements and I'll show you them all up close at the end of the video um and once they were all painted um I'm just going to cure them in this nail lamp um you can also get much cheaper nail lamps than this big one which is a little bit big for this project so I just finished with the top top coat over the top and then cured that so it fully set and is no longer sticky anymore and then I just repeated that on the opposite sides as well so we have our finished plates now stick around um for the finished results of that in a minute but before that I'm going to make the plate rack that will accompany the plates so of course I'm using popsicle sticks and cocktail sticks I also have a new tool which is is a pin Vie I believe which is like a small handheld drill um and is going to be super useful for this project so my plan is to make a sort of two tier plate rack um that is wallmounted and we'll have the little cocktail sticks as holders for the plate going in between so the first thing is making my paper template and um just making the frame to go around which I will be gluing together with some hot glue and um then I decided to make some holes to place the little cocktail stick Parts in now this is not the most best technique um as I soon found out I had made little holes all along and planned to pop them in together um but unless you're extremely extremely accurate um by the time you go to assemble all the little tiny pieces together it just doesn't line up and it looks wonky and the whole thing is out of line so avoid my mistake and do it this way where you stack your pieces up together and drill directly down all three of them at the same time then you can shove that cocktail stick all the way up through as you can see here and they will all stay in line nice and perfect that's the way I learned to do it and I also figured out you can use nail clippers yeah nail clippers for to trim all these bits off really really easily so great little tip I've learned there and I also you can use them for the flat pieces too so after that is all finished um I just put a little bit of molding on the top here just to give it a little more fancy look and we are done so that is my plate rack all sorted not sure whether to put it there or on the other side probably put it there let me know what you think another little tip before you make your plates to fit your plate rack measure the circle that you're going to need using your plate rack um I made mine first this is how I did it and just make a little circle and then you can compare with buttons and other things that are lying around your house in circle form that will be perfect for the template or just make a paper template really doesn't matter or just find buttons that fit your plate rack and you use them as the templates easy peasy so are you ready to see the finished plates and plate rack all together of course you are so here they [Music] are I am so happy with how these plates turned out they have a real handmade quality they're not completely perfectly circular and that's what I love about some Miniatures I tried my best making some really cute little vintage designs you might recognize this one that I'm holding and um yeah I love how these turned out if this video is helpful to you um give it a like And subscribe and if you want to see more tutorials on Miniatures you found the right YouTube channel and uh yeah if you're looking for any other miniature tutorials let me know what you'd like to see the next one we might be doing a sofa or some chairs so stay tuned for that and I will see you in the next one bye [Music]”