
Budget Soldering Station Review - ToAuto DS882 V2 Soldering Station Kit
🛍️ Products Mentioned (1)
Fast/accurate temps, simple setup, w/3 quick adjust settings Amazon Affiliate Product Link: https://geni.us/YpMB As an Amazon Associate, I earn from qualifying purchases. #CommissionsEarned #soldering #toautosoldering #solderingiron Today’s sponsor, @FastToBuy, sent me this complimentary unit for my unbiased review. Don’t forget to check out their upcoming Black Friday and Cyber Monday sales for big savings on this soldering station and other cool DIY and hobby tools! The soldering station consists of two main parts: a metal solder stand with brass wool and sponge, and the soldering iron and rework tool attached to the control unit with 3 ft cables. The only assembly required is to attach the rework handle holder to the top front right-hand corner. This holder is magnetic and will securely hold the rework tool when placed in it. You can use the rework tool as-is, or attach one of the nozzles for a more precise and directed air flow, with a 6.5 or 4mm diameter. To install the nozzles, just slide one over the end and tighten the screw at the collar until it is secure. The extra tips you’ll receive are a knife tip, chisel, beveled, wide, and fine conical tip, and you can store four of them on the back of the soldering iron stand. There’s about 12 grams of tin in the included dispensing tube, though it’s unclear what its exact composition is. The control unit has a 2-3/4” diagonal LCD, soldering button on the left, rework button on the right, menu, up/down, and back keys and three shortcut keys. On the back of the machine you’ll find the power rocker switch, fuse, and power port for the power cable. After plugging the unit in and powering it on, the LCD will display 'standby' for both the soldering iron and the rework tool. Pressing the gear button opens the menu selection. Option 1 sets the soldering iron’s temperature from 150°C to 450°C or (302°F to 842°F). Pressing the gear button again lets you modify this setting and you can increase or decrease it by pressing the up or down keys. Holding a button will change the numbers more quickly. When finished, you can press the gear button to save the setting. Menu option 2 is for setting a temperature offset by up to +/- 50°C. Say you’ve set the soldering iron to 300°C but you find that it’s actually heating to 315°C, you’d want to set the offset to -15°C to compensate in order to get the temperature at the iron tip to match the setting on the screen. Option 3 is the setting for the soldering iron sleep timeout which can be set in 10 minute increments up to an hour or turned off, which I don’t recommended, so I leave it at 10 minutes. Similarly Menus 4 through 7 allow you to adjust the temperature of the rework tool, the amount of airflow, temperature offset for the rework tool, and sleep timeout. Option 8 is for temperature units selection Celsius and Fahrenheit, and Option 9 is for setting a three-digit password to lock and unlock the heating functions, for safety. To begin operation of the soldering iron, press and hold the soldering button for 1 second. You’ll see the current temperature on the screen start rising rapidly with the target temperature in the bottom left. If the soldering iron stays in the holder for longer than your sleep timeout, the iron shuts off temporarily. To wake the iron from this sate, simply pick it up and give it a quick shake, and it’ll heat up to your selected temperature again. It may overshoot for a moment but quickly corrects itself. The tip transfers the heat to your components quickly allowing the tin to flow freely, so you won't need to keep the iron in contact with my components for a long time and risk damaging them. When using the rework tool with a nozzle on the tip, I can direct the hot airflow right at the area of my PCB or component. If you have settings that you use a lot, you can save up to three profiles in the three shortcut keys. Just press and hold the Channel 1, 2 or 3 keys and make your selections. Then when you want to use your saved settings, press the associated button, and they’ll be loaded for you with one-touch. The solder sucker included is pretty standard and works well to remove solder from existing joints. It takes a bit of practice since you'll need to work quickly as the solder will re-solidify if you’re too slow. Overall, I really enjoy this soldering station’s ease-of-use and ability to set accurate temperatures at the touch of a button. The tools both heat up quickly and allow me to solder, de-solder, and apply hot air where I need it. The temperature ranges are broad and can be set accurately using the offset compensation feature, and the handles of the tools don’t get hot during operation. There’s hardly any setup involved, and you can get started soldering out of the box with the included tube of tin. As an Amazon Associate, I earn from qualifying purchases. #CommissionsEarned Amazon Affiliate Product Link: https://geni.us/YpMB
🎬 More from ReviewedByPhil
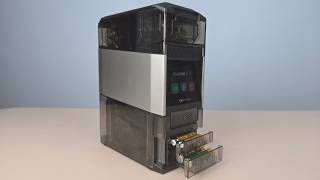
Ostation 2 Pro 3-in-1 Battery Storage and Charging Station Review
124 views

8 Month Review of the Banish Kit 3.0 to Fade Acne Scars, Fine Lines & Dark Spots
134 views
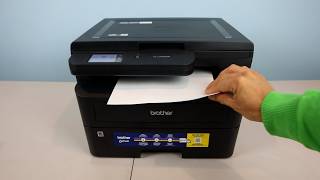
Brother HL-L2480DW Black and White Monochrome Printer Review
248 views

Epson 4K UHD Short Throw Projector LS650 Review
434 views
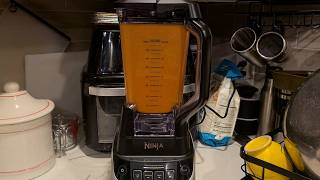
Ninja Ultracrush Professional Blender Kitchen System Review
380 views

Hisense U7 55" Inch 4K Smart TV 55U7SG Review
920 views