Is this your channel?
wallpaper
wallpaper
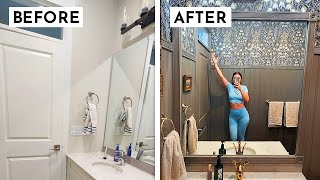
This wallpaper was my “I keep saving it so I should probably just buy it” moment, and it gave the bathroom an instant personality injection. I chose it specifically because it played well with the tile I couldn’t change, and peel-and-stick made it way less intimidating to commit.
Buy on Rstyle
You'll be taken to Rstyle to complete your purchase.
Pros
- +Adds instant personality and character
- +Peel-and-stick is affordable and changeable
- +Beginner-friendly even if you’re uncoordinated (me)
Cons
- -Can be tricky to get perfectly seamless in every spot
- -Wallpaper choices can feel overwhelming
What Vivien Albrecht says
“hello everyone today I'm excited to share with you how I upgraded our Bland and boring bathroom into a less boring bathroom that now looks like this a few years ago we bought a home that was covered floor to ceiling in Builder grade finishes every room looked the same and this bathroom was no exception it was so plain that it actually gave me blank canvas paralysis for months so instead of feeling excited about upgrading it I actually just felt overwhelmed but there were two things I knew for sure that I wanted for this bathroom one was that I wanted to go darker and two I wanted to add wallpaper to give the space an instant personality injection I was also pretty sure that I wanted some kind of floral or Botanical wallpaper there are about 1 zillion wallpaper options out there so it felt extremely overwhelming to make a decision anyways as I was searching for inspiration when I first began the design I deliberately stayed away from the obvious choice which is a William Morris design because as much as I love William Morris I feel like it's already been done a million times but in the process I realized that I kept saving this particular wallpaper design over and over so it was obviously a clear favorite what was important about the wallpaper Choice was that it needed to play well with the colors of the things in the bathroom that I couldn't change namely the tiles on the floor and the tiles in the shower stall the paper I fell in love with luckily looked like it did play well with those things so I trusted my gut and I ordered two rolls luckily it wasn't that expensive either I decided to use peel and stick wallpaper for this project mainly cuz I want to be able to change it easily but also because it's pretty affordable and everyone makes peel and stick look so simple but I've also heard horror stories of how difficult it can be and since I'm extremely uncoordinated I usually Resort to asking my husband for help with this kind of stuff but he was away at the time so I had no choice but to do it myself and you can probably guess how that went well actually it went really well it was pretty easy so I highly recommend peel and stick even if you're uncoordinated like me and look I mean there are a few spots where it's like M it's not perfect but as a whole it's definitely good enough for me and I'm happy in the meantime my husband got back from his trip and kindly offered to help me hang the beadboard paneling beadboard is a wall treatment that has evenly spaced grooves or beads running vertically along its surface and using it definitely helps to add a traditional Vibe I always talk about how adding wall treatments and mill work is great for adding personality to a room it makes all the difference if your main goal is to add character into a room the next logical step was to choose the paint this bathroom hardly gets any light since there's only one small transom window above the shower so I was fully ready to lean into the already low lit nature of the room and embrace the Darkness at first I thought to go almost fully black so I looked for a black that had undertones that matched the wallpaper I sampled three blacks I felt like the black was just a bit much and I know these all look pretty much identical on camera because they looked pretty much identical in person too but yeah so I was stuck for a while on the paint color so I pulled out my trusty paint deck and I just kind of eyeballed colors that looked like they'd work well with the wallpaper and in the end I landed on a color called Smokey Trout from bear so with the paint picked I could finally paint I didn't actually really film myself painting all that much but I mean it's not that [Music] interesting ideally I would have painted the beadboard that goes behind the toilet before hanging it but hey we don't always do things in order around here so I had to devise a weird paint pad thingy in order to paint behind the toilet it actually did work well though I also wanted to paint the cabinets below the sink to match the walls but before I could do that I wanted to add a little extra layer of detail to the boring Shaker cabinets I got some Thin molding and cut it to size to frame the insides of the cabinet fronts I used this mold and cutter that I bought off Amazon and it made the job super easy I I really really love the extra detail that that molding adds to the cabinets I think it's actually one of my favorite additions next it was time to tackle the hardware I was definitely going to replace all these handles these handles were probably the thing I disliked the most about the old bathroom I found this bag of brass knobs at the thrift store a couple of years ago for like $2 and I'd already used them when I diyd our bedroom nightstands I had a bunch left over and I thought they'd be perfect in here so I took off the old handles filled the old holes and I was so scared of messing up when I drilled into the cabinets but in the end it was okay I also decided to add some Hardware to the top part of the vanity here even though this is actually just a fake drawer I just think it adds some more detail to the [Music] room since I was going with Gold Hardware now I decided to paint the existing light fixture with gold spray paint this light fixture definitely wouldn't have been my first choice but paint painting it was a whole lot cheaper than replacing it I figure I can always just replace it later on if I want to for the mirror even though it was really tempting to tear out the giant sheet mirror I didn't I just framed it with molding instead I also use some baseboard trim as a ceiling trim to bring some interest to the ceiling area since I decided actually to not paint the ceiling [Music] next was the shower curtain situation the one we had before was just temporary and it wasn't the right length for our 9-t ceilings I wanted to add a much longer curtain so I actually used real curtains instead of a shower curtain I tried to pull a color that matched some of the colors from the wallpaper and I ordered a few brownie beige options off of Amazon they were all wildly different but there was one color that I liked the curtains came in a pack of too and they were very narrow panels so I actually just hung the two panels next to each other I haven't sewn the panels together yet but shh nobody needs to know that I love the gold shower rod it's a tension rod and the gold Clips they really give the bathroom some much needed Sparkle we replaced the faucet and the drain thingum abber as well and I'm so glad we did in terms of the faucet design I wanted something fun and that sparked conversation I knew that I had picked the right thing when Ponte saw it and went what is this duck let's be clear it's a swan [Music] [Music] so before wrapping up let's just talk quickly about how much I spent I'll put the breakdown up on the screen here for you there are definitely ways that you could bring the price tag down if you wanted to first of all you could do without using any wallpaper and you could just paint instead paint is hands down probably the most transformational and cost-effective way that you can change or update the vibe of your space I could have also just left the faucet the drain and the towel ring and the towel bar the ones I had were perfectly fine but I just wanted a different like look and a different color so I chose to swap those out removing the things I just mentioned would bring the price tag down to about $727 anyways that's it for me today thank you as always so much for watching and I will see you in the next one bye”