
The first 500 people to use my link
Skillshare sponsored today’s video, and I used it as a good excuse to talk about something I genuinely love: developing a recognizable style. If you want structured classes that help you explore creativity and refine what makes your work yours, it’s a solid platform to try.
You'll be taken to Skl to complete your purchase.
Pros
- +Large library of creative classes across multiple fields
- +Good for building habits and exploring personal style
Cons
- -Requires ongoing subscription after the trial
- -Not miniature-painting specific by default
What JuanHidalgo Miniatures says
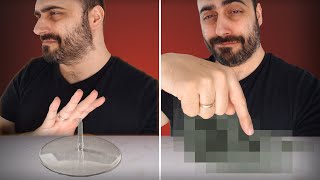
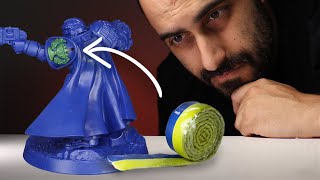
“hello fellow HS of the blue and welcome to my channel I think and I know this is not an unpopular opinion that these things are the worst thing GW has ever conceived which is a big problem considering I plan to play an elder Army so I decided to create a better solution for my grab tanks and I hope you like it too but before we start let me talk to about today's video sponsor a skillshare one of my favorite comments to read on the channel and I read them all is when people tell me they know a work is mine before opening the video I like it because that means my style is easy to recognize today I will help you find your own style with the help of skillshare skillshare is the largest online learning community full of creatives with thousands of classes led by industry experts across film illustration design freelance productivity and more a skillshare come help you take your career skill Hobbies passions or side hustles to the next level for example with a class find your style five exercises to unlock your creativity identity by Andy J pizza for Andy the search to find his style was really the search to find himself back with weird and wonderful examples each lesson includes his favorite projects tips and discoveries along the way whether you are a designer filmmaker writer or musician UNL in your style is the key to feeling fully at home in what you make so starting today invest in yourself starting a Learning Journey on skillshare to explore your creativity and find new passions the first 500 people to use my link in the description will receive a one month free trial of skillshare get started today so thanks again to skillshare for sponsoring this video and let's get cracking so there are a couple of things I want from my new flying stand one it needs to be sturdy obviously two it needs to be removable so I need to be able to take it on and off the stand as I please and finally it needs to look good so I've been given this out of thought because holding this large model by just this little hole of this very fragile connectors just look how fragile this is that's it it's ridiculous it really makes no sense and I also wanted something that I could just buy and I found this is not perfect but it's as best as I been able to find GW CS this is a valkyrie flying stem and base it's just the old flyer uh base with the flyer stem and I'm going to use this uh it's a bit too long but I don't mind cutting it and it also provides that with a really really nice base so I can do a little bit you know bigger basing the model looks better looks amazing and this thing comes with this tab here this is not meant to be used this is part of the sprew but I actually want to keep this because I'm going to use this as my you know insert into the mobel just one issue as you can see this has a cut into it because it's meant to be snapped but we don't want to do that so what I'm going to do is rein Force this make it stronger first thing I will do is remove this little uh Peck here be careful because it will fly off at great speed my first step is going to be to feel that indentation and the idea is to use a bit of sprew to fill that Gap but as you can see the sprew has a different angles this is the normal angle the sprw has you basically want this at a slightly bigger angle and I'm going to hold this with my pliers to be as safe as possible and I'm going to start chopping this into its shape like that be very careful when you do this I don't want you to cut yourself but if you cut yourself remember it's not my fault you can also do this against the table but it's harder to see let's see if that fits now yeah that is absolutely perfect you can either glue this as it is right now but I actually prefer to trim it I'm going to just cut this like this and for that I am going to put it on the table I'm going to try and hold it as firmly as possible but this can be can be a little bit tricky and I'm going to start scoring the plastic again please be very very careful when doing this you can do a little bit of pressure but not too much we don't want to deform this heavily there you go there you go so we place that in that recess in that part there we take some ultra thin glue there you go and we do plenty of this a lot we don't mind this is not going to be seen so doesn't matter if it runs onto that section there now I like take my pliers and apply pressure because what what the glue does is melt the plastic and by adding pressure I'm going to even if my angle and my uh cutting is not perfect this is going to make up for it so I'm just going to just going to press it down just like that so we have this is been drying for about half an hour it's not fully fully dry because we I use so much of this stuff that it's still a little bit gummy but it's is good enough so what I'm going to do is just trim this taking advantage of the Long Blade here just triming so we have a flash surface you see now we have a constant profile and this is now a much more a sturdy joint in connection and hopefully not going to break or anything now it's time to prep our tank base it has this like strut there we need to remove it just on the section aligned with a hole because our slot is going to go through there I like to use some of this Tamia tape and I like it because I can use it as a reference because it's it's rectangular so we have like a good reference and same for the other side and I will try to be as parallel as possible here that is exactly what I wanted because now I have a parallel reference that is closer to what I need to cut and then I get my box cutter or I can use my scalpel if I want more Precision I just light it uh across here and I make a cut there and I do the same on the back side this is so hard to film I can do the same in the other direction just like that now we have exactly what we need to cut perfectly defined here the safest way if you don't own a saw like this is to just cut it using a box cutter and for that I'm just going to very carefully escore it like that and you keep scoring it slowly each pass getting a little bit deeper just like that and at the end of the day you will get a perfectly cut slot just like that what I do now it's ideally I would use a file but I don't have any flat files believe it or not so I'm just going to use my scalpel or my exacto blade to slowly and carefully very carefully please these things are very sharp make the hole tidy and you can test it out out with your uh new holder see it just doesn't really fit lengthwise so I'm probably going to make it a little bit longer it's just a matter of going back and forth until it fits Let's test again I suggest you test little by little you see now it's fitting now it's going in there you go a little bit more very tight which is what we want you want a tight fit it's going to get looser the more you put it in and out yeah I know how that sounds but it's true so it's better if it is a little bit tight now because again the more you you play with it the loser it get oh that sounds off sorry now the only thing we need to do is to cut this to length my suggestion is again to use some tape it makes this very very easy I first tried cutting this parallel to the top section so I made my cut as parallel as possible something like that like that but that doesn't work I I found out it's better if we tilt the Falcon forwards the Falcon chassis if we leave it parallel it feels like it's floating upwards a little bit so you want it slightly tilted and I like more or less this height this height is good I'm going to press the tape and make it tight there you go now we have a straight line that is as I said slightly more tilted than the top slightly a couple degrees something like that what I'm going to do now is score the plastic where I want to cut it and for that I'm going to place my blade I'm going to rest my blade on the tape and very gently follow it we just need to Mark our cut we don't need anything else just marking the cut so we can have a reference for our cut and to make this cut you really need a saw and I'm going to use just that I'm going to place it I'm going to put my so plade just in line with that Mark and I'm going to start cutting being very slow very methodical and very careful to not lose that line this is going to take a while so uh let me stop and I will catch you once I'm done I have this scored most of the way and because this is very brittle we should just be able to do that and it just pops off and what I like to do now now is to make this as smooth as possible I have here some 150 grit this is for metal and I can just place it here as flat as possible and just drag it like that just like that just in One Direction trying not to tilt it [Music] it sounds awful but that usually means it's working after a little bit of sanding we have something that more or less resembles a flat I have a little bit of a lift off at the back well you know no one's perfect and again it doesn't really matter now it's just a matter of gluing this onto the base and I'm going to use the same glue the same Ultra thingin glue just going to flood the lower the joint between the two bits of plastic I like to press it so the plastic melts a bit more you know that's a little bit of a wiggly motion just to make sure we are really pressing it down into the plastic so it melts into a single bit of plastic and by the magic of having already built another one you can see it here fully dried and with a tank there you go look at that looks awesome and it's so sturdy look at that the tank looks amazing in it even if you go to the very very low angles you won't see like a screw or something like that you were always going to see a nice beit of plastic it looks professional looks like a proper flying stand for a proper tank so yeah today's video has been a very basic one but at least for me a very important one I find the old flying stand extremely frustrating so finding a solution that worked and looked good was very important for me there are other Solutions out there but this this is mine thank you for watching this video don't forget that if you like my videos and want to help me make them you can follow me on social media you have the links to all my social media in the description below and in the pin comment of this video share and like this video but most importantly there is patreon and channel members patrons and members allow me to do all the cool videos that I want to make and most importantly they allow me to keep releasing videos for free here on YouTube bks include access to an amazing disc Community full of lovely people access to many more patreon exclusive videos and now also private one-onone tutor Rings help me enjoy the list of the coolest person in the planet including yaming J Christopher Weatherford gilo naan Shel William Sherman Michael Holtz Matt Bro Dr landri Yan shot kidan slate sh Shiro ruselt petol 1970 Steve Page Jason landri brenon raferty Joe Warner fate Sam Brett Malone Joshua Wolf Chase Mory K edia Salas Max krier JH Alexandro laera Sebastian a Oscar F Bia Chris Nick Warner jardo Serano nine W one horses carawa Francesco Gambino kilan 21 painted by ttin laf farel Dark Run Valentine beel Kevin Marshall Adam Carol JV Dona Tristan Lenard mailbox 2112 hi Anderson Carl L Michelle borgi Betty ORD Jason Weber CS Neon 2000 GS Rob Nicholas brownie big V 83 D King benston Martin gusa Alan Hansen Rob hassal stepen K arnal Jay Emerald Steward Anthony Pano Dr H with d Mak ma me Griffiths Victor Cory Tickler lus scor soet 3 G's Marco parnik team scoping R Thomas Wonder imp paria K Tango a strange a RoR Nicholas asbar Benin namely queen of sloth Nicholas DAV a David paoa Benjamin barbar pumpkin here Chris black Jacob matu kre MCO Jake stain Sim Tom Martin rera jesua almad Wallace Robert Millum Daniel peit Henrik jof Ali Cher Ros Adam foots Tyler Hues CH G Joe M Watson h Donald Matthew Lang EST M Romain just Rex Dr C Al J nian con antoan Darvon fix frankon B Danel Ramin bham PL stepan def Rock forber nalos bosi Maximus jaot adamon G Smith hamster Mark Jarvis F Jo Simpson Christoph Mor Charles arming G4 lman K morther Andre Dyer and Kevin suers and that's for me I will catch you the next one [Music] bye it broke by the way I just threw it on the floor and it snapped off via stand you see these things are awful hate them”
Featured in 5 videos
I FIX the WORST thing Games Workshop has ever made, for my Eldar tanks
22K views · 2025-02-19 15:12:17
Painting INCREDIBLE miniatures with NO HIGHLIGHTS | Fire Dragons | Advanced Army Painting
42K views · 2025-01-27 15:04:36

The EASIEST WHITE ARMOUR tutorial EVER. Just THREE steps - Zero Skill 11
58K views · 2024-12-15 17:08:27
I used Greenstuff to sculpt your own Space Marine chapter emblem, and YOU CAN TOO!!
10K views · 2024-11-29 19:29:55

A Day in the Life of a WARHAMMER Painting Teacher
7K views · 2024-10-23 18:23:00