Is this your channel?
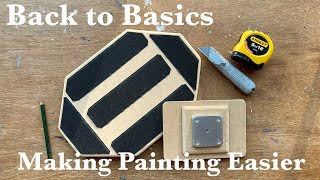
Camera Tripod Bracket
This camera tripod mounting bracket is what makes the DIY adapter board properly compatible with a tripod. It’s a straightforward way to connect painting kit to camera-style quick release hardware without reinventing the wheel.
Buy on Artsupplies
You'll be taken to Artsupplies to complete your purchase.
Pros
- +Creates a practical interface between the board and tripod hardware
- +Works well with quick release style setups
Cons
- -You need to match it to your tripod/plate system
What James Potter says
“hello everyone and welcome back in the last video we were talking about doing a series of videos about watercolor painting and bring it right back to the very beginning and the beginning part really is setting up and setting up is such an important part of painting watercolor uh it if you set up well it makes things much easier to do so today we're going to be setting up with the tripod and how we attach the watercolor paper to the tripod and this is used this is the system I used used for painting indoors and Outdoors so we're going to be making these today in two different sizes for big boards and smaller boards and these are such an important part of your outdoor and indoor setup they connect the tripod to your board your painting board these things um so an integral part of of the painting setup uh it's a very different type of videography for us and Tanya's got her work set out for her today and we're going to have a lot of fun trying to make it so here am I to adapt which have been so wonderfully useful the big one is for large paintings and the small one for small paintings the large one used to be rectangular but I decided to cut it down to make it lighter for when I go plan air painting as I have a lot of other gear to carry as well as I already have two boards I'm just going to trace around these you'll have to measure them out carefully the last thing for me to do is to measure the additional board which is 10x 10 cm as I'm making two adapters I'll be cutting two of them these will be stuck on the back of the board to make them thicker for when we screw in the metal adapter plate [Music] I use a Stanley knife to cut the boards you can use a jigsaw or a Handa I prefer a knife because I don't like the clouds of dust before I start cutting I always put in a fresh blade which makes it so much easier to cut I start the cut by doing two or three Strokes along the line after that it's almost impossible to continue the cut as the blade is too deep in the board to have any further cutting effect after years of struggling with this and making it such hard work to cut the boards I finally found a better and easier way of doing it what I do is an angled cut on the offcut side of the board in other words the bit I don't need and that allows me to finish off the rest of the cut much more easily when you have a go yourself you'll see what I mean when it comes to cutting the two 10x 10 cm boards it's impossible to do a VC cut as I need both of the sides what I do is extend the line of the cut around the edges of the board and continue cutting from the other side [Music] I like rounded edges rather than sharp ones as it makes it more comfortable to use and makes it look so much better I trim off the edges and then sand them off with a block like this but continue the proper sanding Outdoors so I don't get the dust in the flat now moving on to the large board I trim off the [Music] Corners then lightly trim the front side just to get rid of the sharp edges the next step is to turn the board over and make a deeper angled cut this is a really important part of the build as it allows you to get your fingertips in there to get leverage when you pull this adapter and the painting board apart then I finish it all off with a really good sand [Applause] next I glued the 10x 10 cm boards into the back of the larger boards I use wood glue and try and get a good even coverage [Music] I place it on by ey into the center [Music] make sure you put this board on the back of the main board that's the side with a deeper trim where you get your fingers [Music] under I then put some weights on them and left them to dry overnight [Music] [Applause] I place the camera tripod bracket in the center and mark out with a Brattle where the screws will go the screws are about 8 mm long which is why I had to make the extra 10x1 CM board to stop them poking out of the front surface then drill a pilot hole not too deep just to avoid going all the way through to the front I drilled to about 4 mm I use a threaded rattle to start the screws off [Music] easily remove the tape and stick it down lining up the holes I use 50 mm industrial strength sticky velcro make sure you use the rough hook side I've listed and linked all the products I've used in the description I like to trim the corners just to prevent it peeling off in the future [Music] [Music] [Music] I use the handle of the scissors to push the velcro down just to make sure that it's really stuck onto the board [Music] originally my board was rectangular this made it much easier to apply the velcro with this board I'm having to trim the edges which just makes it a little bit more complicated [Music] [Music] [Laughter] the last thing I do is attach the quick release plate mine is from a manfroto tripod you can swivel it to have it in the portrait or landscape position [Music] if you have a ball head on your tripod you can just turn the board from portrait to landscape now all you have to do is line up the velcro on the painting board and then lightly press it in it's easy to get the painting board off the adapter as I made the angle cut to get my fingers in to lever it apart here's a larger painting board which I attached to the larger adapter board [Music] in the next video I'll be showing you how to make the painting boards well it was fun making these uh we really enjoyed the whole video process and uh particularly the close-up shots and the sound effects that was new to us and uh a lot of fun to make these won't go to waste I've got two of these now which is really good two sets of them and one of them is going to be kept in in the studio and one of is going to be kept in the camper van uh I've often forgotten one of these because I it's in my studio so we drive away and then I got to come back to get it so that problem is going to disappear now in the next video we're going to be practical again and we're going to be continuing with the setup of watercolor painting making these These are the board or paper holders that we use to hold the paper so there it is and I find them really fantastic a wonderful addition to my outdoor and indoor painting thanks for watching that if you enjoyed it please give a thumbs up or possibly even a comment uh doing that really helps the channel it really helps with the YouTube algorithms uh which is so important so until next time thanks for watching and goodbye”