
How to Make a Simple DIY Hemp Rope Houseplant Pot / Planter
🛍️ Products Mentioned (3)
Rope wrapped planters look really good in your home and are quite simple to make, in this video, I will show you how to make a simple jute rope plant pot. Also called Hemp rope, It's 100% natural fibres and eco friendly. For this project, I'm using 5mm hemp rope, you can grab it here: https://geni.us/BraidedHempRope Glue Gun: https://geni.us/GlueGun My Harvest Knife: https://geni.us/HarvestKnife Now I’m going to need to use a plastic pot to form the shape and if I want the pot to last I can’t plant directly into the rope pot, so it will have a plastic pot inside but we haven’t quite found a usable alternative for plastic yet and these pots I use are all reused from other plants I have bought in the past so we’re recycling here! While it’s looking good in my home it can’t make its way into the ocean so I’m happy enough with that for now. So what do we need for this DIY project? Not much really, obviously the rope to wrap around the pot, a pot to wrap the rope around, a hot melt glue gun and my trusty garlic harvest knife that I use for everything, link to everything down in the description as always. So to make the base I’m just going to put a blob of glue on the end of the rope to fix it in place and start coiling it around itself, it’s a bit fiddly, it’s easier to do it if you lay it flat on a surface so it will keep it flat as you coil it around. Test fit for the size, I’ve decided that I want mine totally flush with the pot because my platted rope will go over the top of it, you can make it a little bigger if you like so the braided rope sits on top of the base so you can make a feature of the different type of rope but for this one, I decided to cover it up. When cutting the rope sharp scissors are probably best and try to cut at an angle so you can blend the rope into the coil so it doesn’t just stop and leave an unsightly gap at the end. ROPE EXAMPLE: Now, this is my test piece of braiding the rope to make an interesting pattern like the seagrass pot I’m taking inspiration from, I think it looks pretty good especially as it’s already braided when it was made it gives a nice texture to it. I did it by tying the end to the to my watering can and starting to make the plat, you need three equal lengths and plat like you would someone’s hair, left hand over the first and under the second strand, now repeat all the way along. The key is to keep an even tension throughout the plat so it looks the same all the way through, it doesn’t matter if you keep it tight or slightly looser as long as it’s the same all the way through. The only issue I found with this is that the rope strands behind my plat were getting tangled up and I had to keep stopping to sort them out, so I came up with a new plan, I tied the rope to a door handle and wound each strand up so I only had a few inches at a time, that way as I plated the rope they sorted themselves out just by hanging there, you can pause and unroll and little more as you go, I found that much easier. There we are, I’m quite pleased with that for a first attempt, it looks pretty neat, I’m now going to use a single strand of the hemp rope to finish off the top of the pot. So there was a small gap at the top of the pot so I started the top piece there, just another blob of glue and work it around the top, I’m putting glue nearly all the way around the top on this piece because it needs to be in the exact place to look right, just take your time and keep it neat as you go, once again I’m cutting the rope at an angle so I can blend it into the rope at the other end so it doesn’t stand out as much. There that looks nice. I’m going to do the same again for the top of the lip so you don’t see any of the pot when it’s done. Same again, a thin line of glue all the way around, as the two pieces of rope are meeting straight on I’ve just cut them straight and tried to blend them in together, make sure you can as precisely as you can so you don’t end up with too much or too little, a sharp pair of scissors will help a lot here. There we are, I’m quite pleased with that, you can go round with a sharp blade and pair off any hard glue that’s sticking out from anywhere. There we are, all planted up, a reasonable first try, I’ve got some more ideas for different patterns and sizes for the future, If you enjoyed this one and would like to see more please let me know by leaving a like, and tell me what you think in the comments, I’m always keen to hear your thoughts, thanks for watching and I’ll catch you again soon on the very next video.
🎬 More from Houseplant Hacks

Don't Make This Mistake Repotting Your Strelitzia!
242 views

The Secret Trick to Make Poinsettias Turn Red Again
1.1K views
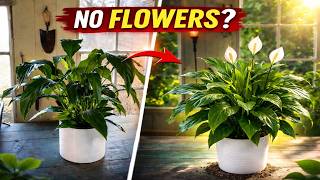
How to Make a Peace Lily Bloom Again (3 Simple Steps)
3.7K views

The ONE good thing about February in the UK - Winter Flowering Jasmine🌸
463 views
11 Months Waiting - Then THIS Happened 🌼 Winter Jasmine Flower Time” Jasminum Polyanthum White Star🌟
1.1K views

The Secret to Getting Poinsettia to Rebloom for Christmas
1.1K views